Thursday, June 30, 2016

A July 4th Tradition at HFCC - The American Flag

With July 4th this coming Monday, we had to prepare the traditional American flag on the 17th fairway a few days early.  This year, my two assistants, Josh Cantrell and Chris Cowan did most of the preparation and the heavy lifting (the painting and the clean-up).  With outstanding weather, the job went nearly perfect and we again have that beautiful sight on the 17th fairway.  

Simple tools for set up.
The twine marks the boundaries of the "stars and bars".
All of the paint must be mixed prior to application.
Spray boards are used to keep the paint within the lines.
For about 10 years now, the HFCC maintenance staff has been painting the American flag on #17 fairway.  17 was chosen as it provided a perfect position for the flag to be seen from the clubhouse.  The flag measures 100 feet across and takes over 1500 feet of twine to set up.  We use 10 gallons of red, 10 gallons of white, and 5 gallons of blue turf paint in addition to a case of white spray paint.  We also go through a few pairs of old shoes and pants. From start to finish, it takes approximately 4 hours to complete.

Taking shape.
Spray boards keeping the paint within the lines.
The twine also helps line up the stars.
Chris and Josh feeling good about their latest work of art.
USA!

A Brief History of the American Flag

The current official U.S. flag is a 50 star flag, born of the need for a more practical design to accommodate new states entering the union. On April 4, 1818, Congress established the number of stripes at seven red and six white, and provided the addition of one star for each new state. The thirteen stripes represent the original 13 colonies. The 50 star flag has been in use since July 4, 1960 when Hawaii officially joined the union.
In the first years of the Revolutionary War, America fought under many flags. One of these flags, called the Grand Union, flew over George Washington's headquarters near Boston. It was the first American flag to be officially recognized by another country.
Grand Union Flag
On November 16, 1776, the American warship, Andrew Doria, saluted a Dutch fort in the West Indies and was saluted in return. This brought a measure of international recognition to the United Colonies.  A flag with thirteen stars and thirteen stripes received its first salute from another country on February 14, 1778, when French vessels in Quiberon Bay, France, saluted John Paul Jones and his ship, "The Ranger."
No one positively knows who designed the first Stars and Stripes, or who made the first flag. Soon after the flag was adopted by our new government, Congressman Francis Hopkinson claimed that he had designed it. Some historians believe that Betsy Ross, a Philadelphia seamstress, made the first U.S. flag.
On June 14, 1777, in order to establish an official flag of the new nation, the Continental Congress passed the first Flag Act: "Resolved, that the flag of the thirteen United States be thirteen stripes alternate red and white; that the union be thirteen stars, white in a blue field, representing a new constellation."
13 Star American Flag
Today, that union consists of 50 stars representing all 50 states.


Friday, June 24, 2016

Bunker Rake Placement and Course Etiquette

Bunker Rake Placement

Every year I get the question of where to place the bunker rakes; in the bunker, partly in the bunker, or outside the bunker?  The USGA has no specific rule on bunker rake placement and recommends the committee decide where it wishes the rakes to be placed.  As a result the HFCC G&G committee would like all members to put the rakes on the inside edge of the bunker.

Rakes on the inside edge of a bunker.
The reason for putting the rakes on the inside edge of the bunker is simply a matter of economics, it reduces maintenance costs.  When the mowers do not need to stop the machine and move all the rakes they are more efficient and can finish quicker.  While stopping and moving a rake may not seem like much, stopping for nearly 70 bunkers and doing this through a season adds up to thousands of dollars in labor costs.

Course Etiquette

It is at this time of year that I like to review some basic rules for the golf course.  These rules help to keep our beautiful course in great shape and allow your fellow golfers to experience the course at its best.

Cart Path Only Rule – During times of wet weather or severe turf stress, carts must stay on the cart path.  This is both for the course’s protection and yours.  Remember, all par 3’s are cart path only.

90° Rule – After hitting each shot, travel down the cart path until even with your ball and travel at a right angle to your ball, hit your shot and travel back to the path using a 90° line back to the path.  Signs at the white tee markers will indicate whether the hole is 90° or Cart Path Only.  It is possible that some holes will be 90° and others Cart Path Only.  Please pay attention to the signage.

Wet Area Signs – Please keep carts away from wet area signs as these designate areas on the fairway that are too wet to accommodate cart traffic.

Divots in Fairways and Roughs – Please replace all divots in fairways and roughs, then, press firmly with your foot.  These can also be topdressed with the sand provided in the carts.

Divots on Tees – Please fill all divots with the sand provided at the tee as these have seed in them.  Do not use the sand in the boxes at the tees to fill your sand bottles, as we do not want the seed in the boxes to contaminate the other grasses on the course.  However, you can use your sand bottles to fix divots on the tees.


Ball Marks on Greens – Please repair your ball marks on the greens.  If you cannot find yours, please repair any ball mark that you see.  The correct method for repairing a ball mark is to place your repair tool on the outside edge of the ball mark and pull the edge inward.  Do this all around the ball mark and then flatten lightly with your putter. 

Monday, June 6, 2016

The Ponds Are Repaired

As everyone has seen, the lake on #8/#9 was drained during the better part of May to replace a rusted “overflow” structure.  I am happy to report that the new structure was successfully installed a few weeks ago and the lake is now full.  In addition to replacing the "overflow" structure, we repaired the rock wall around #9 tee that collapsed while the lake was down and installed 5 pallets of sod to the area of disturbance.
#1  After discovering a problem with the "overflow" structure, the lake was lowered.
#2  A concrete block had to be removed before the "overflow" structure could be taken out.
#3  After removing the "overflow" structure, it was clear why the lake was leaking.
#4  A coffer dam had to be installed so that workers could work on installation of the new "overflow" structure.
#5  The existing drain pipe had to be cleaned before being joined with the "overflow" structure.
#6  The "overflow" structure consists of a stand pipe, drain pipe, and drain valve all covered in tar.
#7  The structure was carefully fitted and lowered into place.
#8  Concrete was poured around the coupler to both seal the joint and to keep the structure from floating.
#9  The "overflow" structure as seen from the surface.  A trash screen has yet to be installed.
#10  Success.
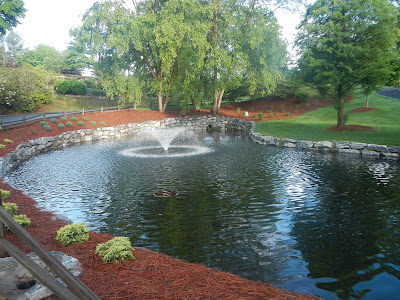
Next we have the issue of the pond on #1 being drained.  Again, this was a problem with the "overflow" pipe.  However, this was a case of poor installation from a contractor for the HOA who hastily installed the pipe while replacing culverts throughout the property.  The good news is that they recognized the issue and have repaired the pipe.  Our staff added several yards of concrete to make sure the pipe stays in place.  We have just recently filled the pond back up and everything is back to normal.
#1 pond in all its glory.
While none of us likes to have major problems happen as the season starts, sometimes its just out of our control.  We just take a moment and develop a solid plan to correct the problem and move on. While the repairs to the ponds took a little longer than anticipated, the repairs are solid and good for many more years which in the end is better than a quick fix.